Here are the steps on how to insert a textbox.
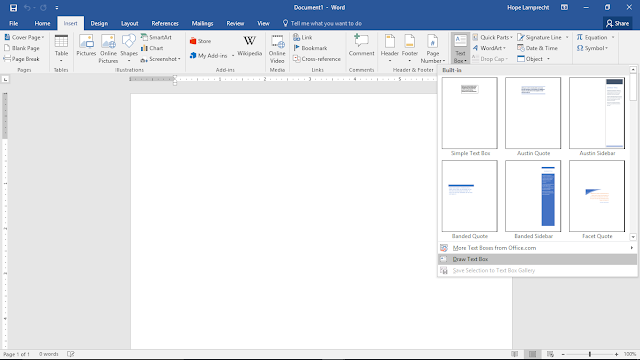
1. First, you need to open the word document and click the insert tab. On the insert tab, in the text group, click text box.

2. When you click text box, a drop down box offers some custom text boxes for you to use. If you want to create you own, click draw text box.
3. After you click draw textbox, you click on the document and drag the textbox to the size you would like. After you make your textbox, you can move the textbox wherever you would like on the document. If you would like to make it bigger or smaller, you can easily drag the white dots on the perimeter of the box to make it the size you need. You also change the height and width of the textbox by clicking on the drawing tools format tab. On the very right of the ribbon, there is a box where you can type an exact amount that will change the size of the box.

Textboxes are very useful in creating a brochure, invitation, letterhead, invitation, and many more. They offer the text to be whatever size you need and it can be moved anywhere on the text, and the box can also be tilted at any angle. The box can have a shape outline, a shape fill, or also a shape effect. Textboxes can be used to draw attention to something on a document. Textboxes give you control over a position of a block of text in a Word document.
1. First, you need to open the word document and click the insert tab. On the insert tab, in the text group, click text box.

2. When you click text box, a drop down box offers some custom text boxes for you to use. If you want to create you own, click draw text box.

3. After you click draw textbox, you click on the document and drag the textbox to the size you would like. After you make your textbox, you can move the textbox wherever you would like on the document. If you would like to make it bigger or smaller, you can easily drag the white dots on the perimeter of the box to make it the size you need. You also change the height and width of the textbox by clicking on the drawing tools format tab. On the very right of the ribbon, there is a box where you can type an exact amount that will change the size of the box.

Textboxes are very useful in creating a brochure, invitation, letterhead, invitation, and many more. They offer the text to be whatever size you need and it can be moved anywhere on the text, and the box can also be tilted at any angle. The box can have a shape outline, a shape fill, or also a shape effect. Textboxes can be used to draw attention to something on a document. Textboxes give you control over a position of a block of text in a Word document.
Comments
Post a Comment